ABSTRACT
Data warehouses, also known as online analytical processing (OLAP), store data that has strict data types that conform to a schema with rows and columns in a denormalized table. Data warehouses are designed for analytic processing to help business with decision making. The way that the data is stored is optimized for speed and analysis purposes. Examples include Amazon Redshift, Oracle, Teradata and Greenplum.
Challenges of traditional architectures and on-premises data warehousing
- Difficult to scale and long lead times for hardware procurement
- Complex upgrades are the norm
- High overhead costs for administration and expensive licensing and support costs
- Proprietary formats do not support newer open data formats, which results in data silos
- Data not catalogued, unreliable quality
- Licensing cost limits number of users and how much data can be accommodated
- Difficult to integrate with services and tools
AMAZON REDSHIFT
Amazon Redshift is a fully managed cloud data warehouse that’s highly integrated with other AWS services.
Key features include:
- Optimized for high performance
- Support for open file formats
- Petabyte-scale capability
- Support for complex queries and analytics, with data visualization tools
- Secure end-to-end encryption and certified compliance
- Service level agreement (SLA) of 99.9 percent
- Based on open source Postgre database
- Cost efficient
What makes it better than competitors?
- Massively parallel processing (MPP)
Takes a large job and breaks it into smaller tasks, then distributes the tasks to multiple compute nodes. Result: Faster processing time
- Columnar storage
Data from each column is stored together so the data can be accessed faster, without scanning and sorting all other columns.
Result: Compression of stored data further improves performance.
- Shared-nothing architecture
Independent and resilient nodes without any dependencies.
Result: Improves scalability.
Steps involved:
- Architecture of Data Migration from On-Premises Data Warehouse to Amazon Redshift
- Converting Schema Using Aws SCT (Teradata To Redshift)
- Installing Data Migration Agent in On-Premises
- Registering Agent and Creating Migration Task
ARCHITECTURE OF DATA MIGRATION FROM ON-PREMISES DATA WAREHOUSE TO AMAZON REDSHIFT

Description:
In many cases we have to migrate where source and target databases are different from each other. In this case we will use Migration agents to complete these tasks.
- We connect both to source and target database with AWS Schema Conversion Tool (SCT).
- Using Schema Conversion Tool, we convert metadata and load them to target (Redshift).
- Then the Migration agent will extract your data and then uploads them to S3 Bucket through secure channel. For this you will need to have write permission to S3.
- You can then use AWS SCT to copy the data to Amazon Redshift.
SAMPLE DATABASE FOR TERADATA
We will migrate Adventure Works database created for Teradata. You can download and install it on your Teradata warehouse. You can find more information on it at this Teradata blog: demo databases for download.
ABOUT SCHEMA CONVERSION TOOL
AWS Schema Conversion Tool (AWS SCT) is used to convert your existing database schema from one database engine to another. You can convert relational OLTP schema, or data warehouse (OLAP) schema. Your converted schema is suitable for an Amazon Relational Database Service (Amazon RDS) MySQL, MariaDB, Oracle, SQL Server, PostgreSQL DB, an Amazon Aurora DB cluster, or an Amazon Redshift cluster.
For more about AWS SCT go to Official Documentation.
CONVERTING SCHEMA USING AWS SCT (TERADATA TO REDSHIFT)
1.Run Schema conversion tool. Go to file> Create New project. Select Data warehouse (OLAP). Select source engine as Teradata and target engine as Amazon Redshift

2. Connect to Teradata, which is at on-premises location. Give following credential and test Connection.

3. Connect to Amazon Redshift. Give following credential and test Connection.

4. Go to Settings > Global Settings.
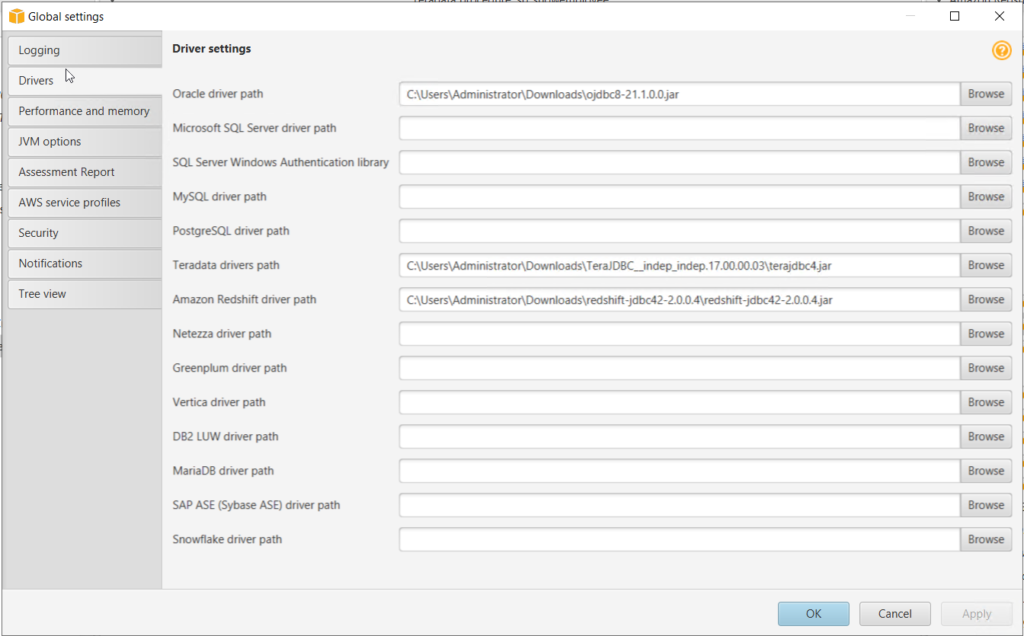
a. Browse to JDBC drivers of source and target data warehouse. Download JDBC drivers if not available.
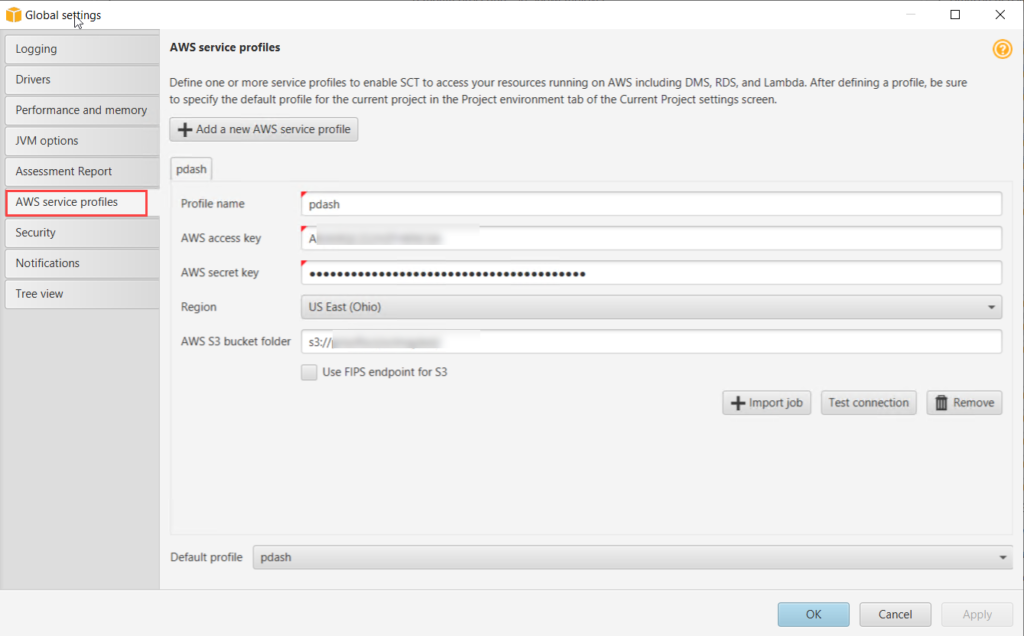
b. Add AWS Service Profile and a S3 bucket.
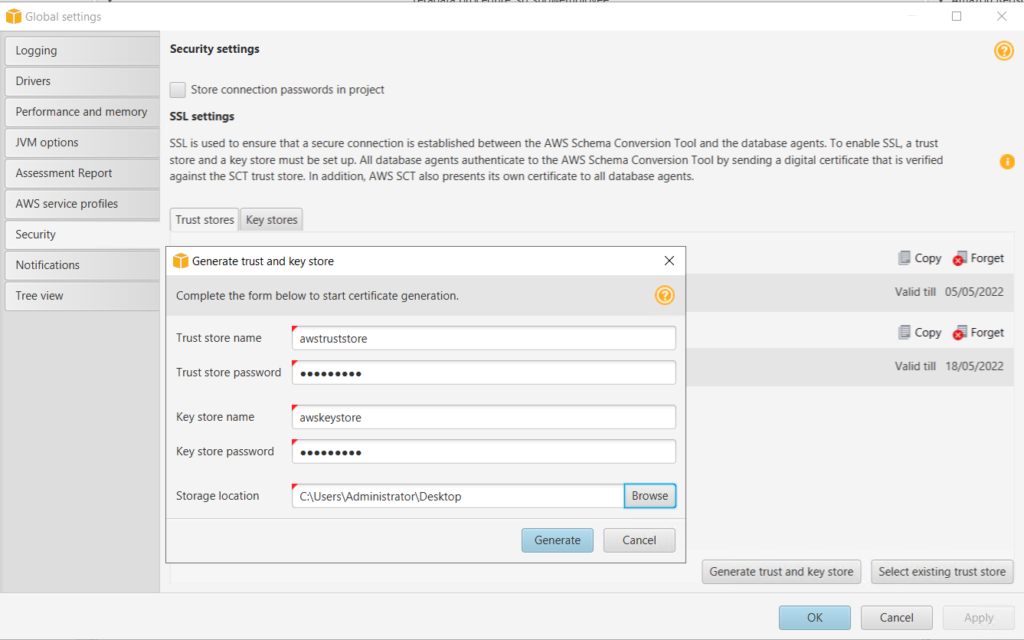
c. Generate trust and key store. These will be used for secure connection with Migration agents.
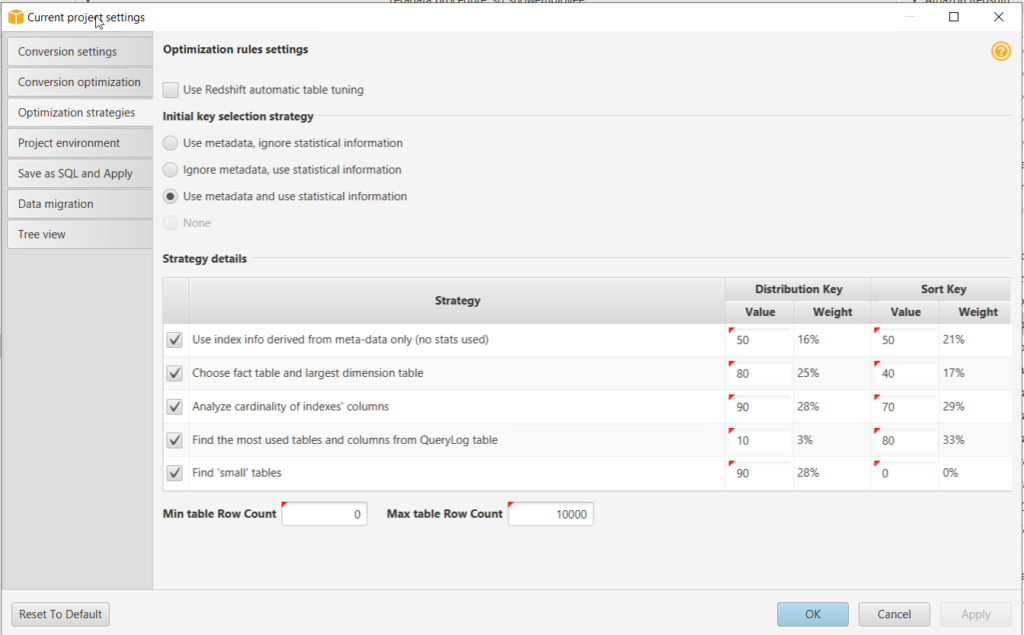
5. Go to Settings > Project Settings. Go to Optimization Strategies.
a. Use metadata, ignore statistical information– In this strategy, only information from the metadata is used for optimization decisions. For example, if there is more than one index on a source table, the source database sort order is used, and the first index becomes a distribution key.
b. Ignore metadata, use statistical information– In this strategy, optimization decisions are derived from statistical information only. This strategy applies only to tables and columns for which statistics are provided.
c. Use metadata and use statistical information– In this strategy, both metadata and statistics are used for optimization decisions. (Default Selected)
6. Click on database to be migrated. Tick and right click on it. Click Covert Schema and Proceed.

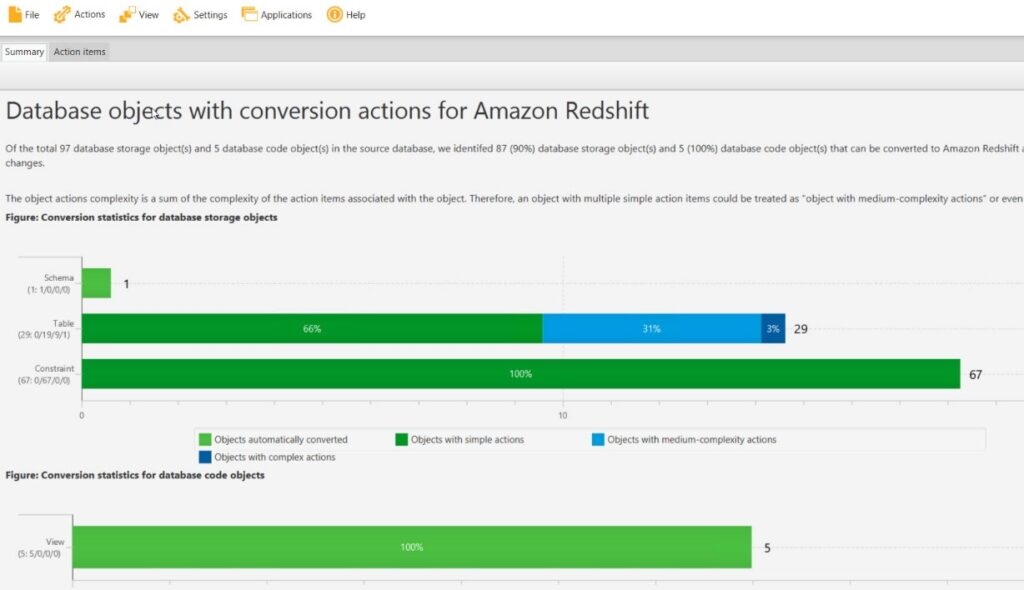
7. After conversion completed go to View > Assessment Report View.
a. See if any actions needed (Red Colour). If any manual update required go to action tab and correct SQL code accordingly.
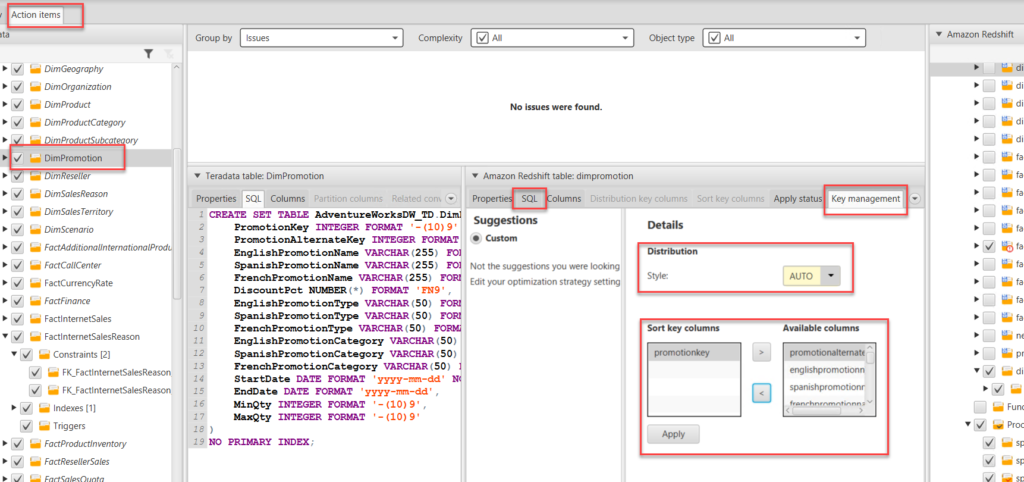
b. In the action tab we can manually edit SQL query even if there are no errors.
c. Here we can manually define Distribution Style and Sort keys as shown below.
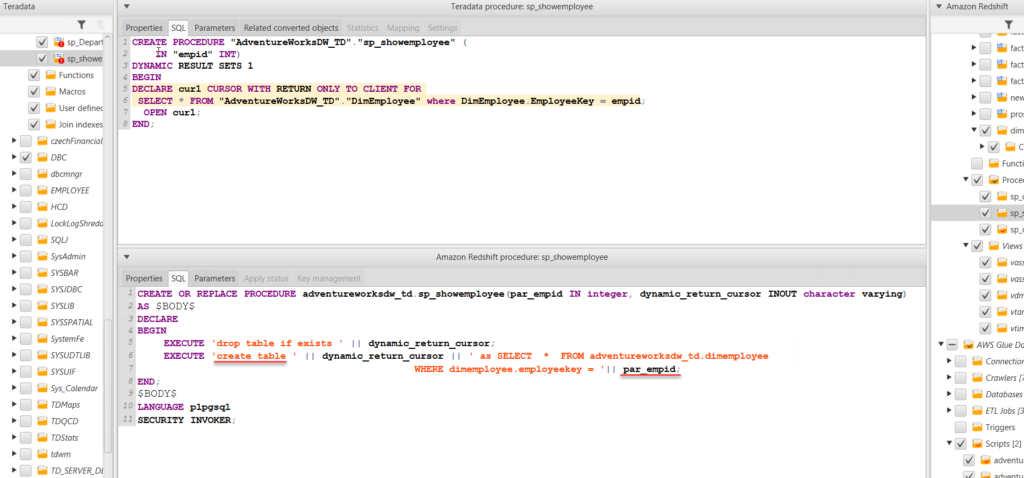
8. On Redshift the Procedural language in based on Procedural Language PostgreSQL(plpgsql). Procedures from Teradata are also migrated to AWS Redshift but often this requires manual edit of SQL before applying to database. Examples:
- Refcursors are not available in Redshift, so a table is created in order to store the cursor output, which can be queried as normal select statement.
- Parameter “par_emid” is separated using string concat (‘||’). Previously it was included in select statement, so parameter passing is not working.
9. After modification on Redshift-side (Right panel) tick and right click on database.
a. First click on Load Schema.
b. Then Click on Apply to database and proceed. This will create Schema, Tables, Views, Procedures etc. in the Redshift Data Warehouse.
c. If there are errors during load. You will find the in STL_LOAD_ERRORS. You can browse errors running sql query in redshift editor:
Select * From STL_LOAD_ERRORS.

INSTALLING DATA MIGRATION AGENT IN ON-PREMISES
1. Install “aws-schema-conversion-tool-extractor” that comes with installation package of AWS SCT. You also might need “amazon-corretto” before installing AWS SCT.
2. Here we are using migration agents on windows.
a. During the setup add necessary JDBC drivers.
b. Select SSL and proceed with next.

c. In next step Add path to trust store file and key store file, that we have generated previously.
Add password and click next. Your installation will be completed. See the host Address in ipconfig.
The default port is: 8192

REGISTERING AGENT AND CREATING MIGRATION TASK
1. Now back to AWS SCT. Go to View > Data Migration View
2. In the center panel go to agent tab and click on Register.
a. Enter hostname (or IP address), port. Select use SSL.

b. In the SSL tab select the trust store and key store, that you created in Global Settings > Security

3. In the Teradata panel, right click on tables and create local task.

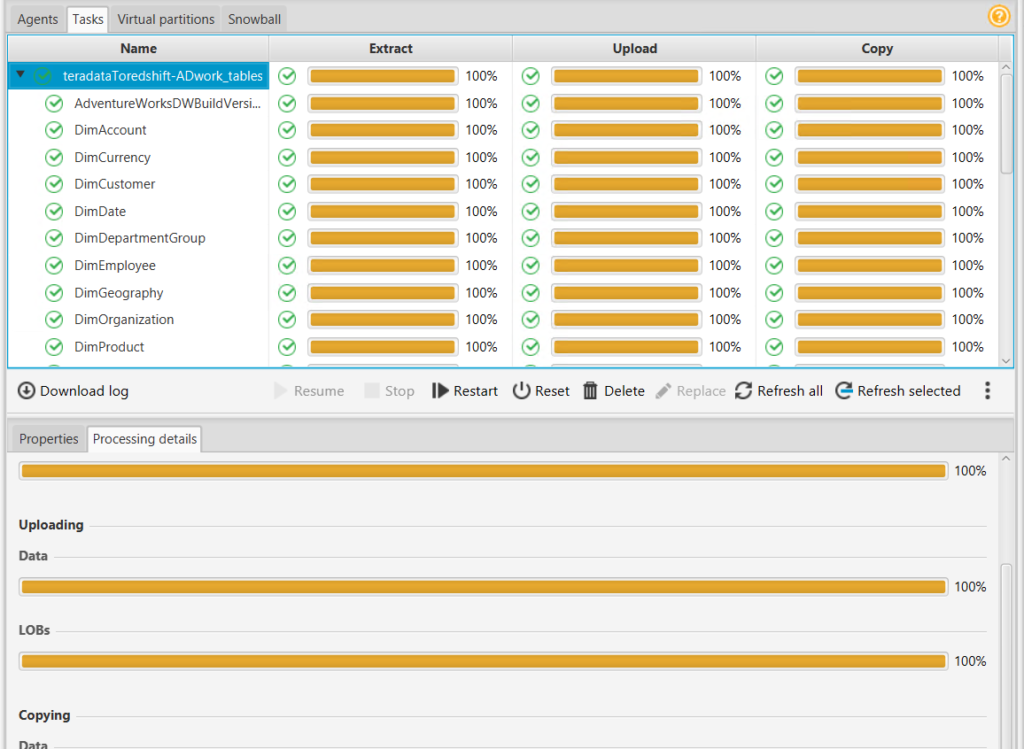
4. Choose Migration mode to Extract, upload and copy. Tick on Extract LOB (This will load LOB to S3 bucket as files. Test the task. if test successful click on create

5. Select the migration agent and start the migration task. After a while all data will be migrated to redshift. You can see in the processing details tab, if there are errors during data loading.
CONCLUSION
Using Amazon Redshift is fast, Reliable, scalable and Cost effective. Though data migration tasks are difficult and tedious, AWS provides various tool and techniques to make the migration task smooth and quick. AWS Schema Conversion Tool plays vital role in converting schema and migrating data from On-premises data warehouse to Redshift.


