Abstract
Data pipeline is a set of operations, starting from getting data, transforming them and moving them to required destination for process and analysis. In Amazon we have Redshift, a petabyte scale data warehouse, where the data is stored for faster analysis. Data can be moved to Redshift swiftly from Amazon S3 with copy command from various formats such as CSV, Avro, Parquet, json etc. We can also use AWS Glue (Amazon Managed ETL service) for moving data from s3 to Amazon Redshift. These jobs of ETL (Glue Job) can be triggered on demand or on scheduling, but here we are going to demonstrate how a Glue job auto triggers when a file is uploaded to amazon s3. For this we are using Lambda Functions triggered by Amazon CloudWatch events and also Amazon Simple Notification service (SNS) for sending an email when the Glue Job is completed.
Architectural Diagram

Brief Description
- When a CSV file is put to the specified location in a bucket, an event triggers a lambda function.
- Lambda function written in python will start the glue crawler, which will populate Glue Catalog with the table schema from the CSV Data.
- This data can be analyzed with Amazon Athena, a Server-less analytical service or Redshift Spectrum without the data being loaded in Redshift. Further we can visualize this data in Amazon Quick Sight or any other visualization tool.
- On the other hand, when the Status of Glue Crawler is being monitored by CloudWatch. When the status of Crawler is changed to succeeded, another Lambda Function is triggered.
- Lambda function sends out email on Glue Crawler success to its topic subscribers. Further it begins the Glue job which will transfer the data to Redshift. After that the data can be analyzed and visualized in various tools and services.
- After the Glue Job finished successfully (Monitored by CloudWatch), an email is sent out via Amazon SNS using lambda Function.
Brief Introduction About Various Services
Amazon S3: Amazon Simple Storage Service (Amazon S3) is an object storage service that offers industry-leading scalability, data availability, security, and performance. This means customers of all sizes and industries can use it to store and protect any amount of data for a range of use cases, such as data lakes, websites, mobile applications, backup and restore, archive, enterprise applications, IoT devices, and big data analytics. Read more>>
AWS Lambda: AWS Lambda is a serverless compute service that lets you run code without provisioning or managing servers, creating workload-aware cluster scaling logic, maintaining event integrations, or managing runtimes. With Lambda, you can run code for virtually any type of application or backend service – all with zero administration. Read more>>
AWS Glue: AWS Glue is a serverless data integration service that makes it easy to discover, prepare, and combine data for analytics, machine learning, and application development. AWS Glue provides all of the capabilities needed for data integration so that you can start analysing your data and putting it to use in minutes instead of months. Read more>>
AWS Redshift: With Redshift, you can query and combine exabytes of structured and semi-structured data across your data warehouse, operational database, and data lake using standard SQL. Amazon Redshift has up to 3x better price-performance than other cloud data warehouses, and the price-performance advantage improves as your data warehouse grows from gigabytes to exabytes. Read more>>
Amazon Athena: Amazon Athena is an interactive query service that makes it easy to analyze data in Amazon S3 using standard SQL. Athena is serverless, so there is no infrastructure to manage, and you pay only for the queries that you run. Read more>>
Amazon Quicksight: Amazon QuickSight is a scalable, serverless, embeddable, machine learning-powered business intelligence (BI) service built for the cloud. QuickSight lets you easily create and publish interactive BI dashboards that include Machine Learning-powered insights. QuickSight dashboards can be accessed from any device, and seamlessly embedded into your applications, portals, and websites. Read more>>
Amazon CloudWatch: CloudWatch collects monitoring and operational data in the form of logs, metrics, and events, providing you with a unified view of AWS resources, applications, and services that run on AWS and on-premises servers. You can use CloudWatch to detect anomalous behavior in your environments, set alarms, visualize logs and metrics side by side, take automated actions, troubleshoot issues, and discover insights to keep your applications. Read More>>
running smoothly.
Amazon SNS: Amazon Simple Notification Service (Amazon SNS) is a fully managed messaging service for both application-to-application (A2A) and application-to-person (A2P) communication. Read More>>
Prerequisites:
- Get the Sample data of TLC Trip Record Data, from https://www1.nyc.gov/site/tlc/about/tlc-trip-record-data.page.
- Get Access to all the service mentioned above. Here we have used an admin account to perform task.
- Create a Redshift Cluster (dc2.Large | 1 node |160 GB) comes free in free tier for 750 hrs. Redshift and s3 should be in same region.
Hands-On Steps
- Put sample data into Amazon S3.
- Create and Run Glue Crawler.
- Create a table in Redshift and crawl this table to Glue data catalog.
- Creating Glue Job to Load Data to RedShift.
- Verify data loading in Amazon Athena or Redshift Spectrum.
- Create Lambda Function to Trigger Glue Crawler when object is created in Amazon S3.
- Create AWS SNS topic to send out Email notifications.
- Create Lambda Function to Start Glue job when Crawler Status is succeeded and send email via SNS.
- Create Lambda Function to Send Email when Glue Job is Successfully Executed.
- Create CloudWatch event to Trigger Lambda Function When Glue Crawler State is Succeeded.
- Create CloudWatch event to Trigger Lambda Function When Glue Job State is Succeeded.
- Test Data pipeline and Visualize in Amazon Quicksight.
Walk Through Hands-On:
Step 1: Put sample data into Amazon S3.
Create a bucket (example: Prisoft-glue-demo). Inside the bucket create folders. The name of the folder that contains the data files will be the name of the table in the Glue data Catalog. Download a sample csv file from TLC trip record and upload it to specified folder in s3.

Step 2: Create and Run Glue Crawler.
- Go to Amazon Glue console. Create a Glue Crawler. Crawler info: Give name of the Glue Crawler. Example: “nyctaxicrawler”
- Crawler Source Type: Choose default and click next.
- Data Store: Choose s3 as datastore. Put s3 path as follows = s3://<bucket>/<folder>. Click Next.
- IAM Role: Choose or create an IAM role.
- Schedule: Choose frequency to Run on Demand.
- Output: Add a database of Choose existing one. Click next.
- Review All Steps: Review all the steps and click on Finish.
 Go back to Crawlers, tick on the crawler you created. Click Run Crawler. You can see Starting at side of your crawler. After few seconds the crawling will be done and you can see 1 table added.
- The database and table can be seen in the Data Catalog. Go to table and see the table properties and schema.
Step 3: Create a table in Redshift and crawl this table to Glue data catalog.
- Open Redshift console and go to Query Editor. Create schema and table using the following SQL code. You can refer glue table properties to write the table DDL code.
Create schema nyctaxinew;
Create table nyctaxinew.nyctaxiraw
(
vendorid bigint,
lpep_pickup_datetime varchar,
lpep_dropoff_datetime varchar,
store_and_fwd_flag varchar,
ratecodeid bigint,
pulocationid bigint,
dolocationid bigint,
passenger_count bigint,
trip_distance float,
fare_amount float,
extra float,
mta_tax float,
tip_amount float,
tolls_amount float,
ehail_fee varchar,
improvement_surcharge float,
total_amount float,
payment_type bigint,
trip_type bigint,
congestion_surcharge float
);
- Go to Glue Console > Connection. Click on Add Connection.
- Choose a Connection Name. Choose a Connection type as JDBC.
- Enter the JDBC URL of Redshift Cluster (Cluster> JDBC Endpoint), Enter username and password. Choose the VPC.
- Review Steps and Click on Finish.
- After the connection has been created, select it and test the connection. While testing choose the IAM role you created previously for glue crawling.
- Now add a crawler similar in Step 2. But here the Data Store is as follows.

- In the output choose the same database as in step 2. After crawler is created, Run the crawler. Now you will see two tables present in the data catalog, one is from s3 and another is from redshift. These will be act as source and destination in the Glue Job respectively.

Step 4: Creating Glue Job to Load Data to RedShift
- Go to Glue Console > Jobs. Click on Add Job. Give Name to the Job. Choose the IAM role created previously. But now go to IAM Role and attach policies such as:

- Configure the Job properties. Give Name and IAM role.
- Type: Spark
- Glue Version: Spark2.4, Python with improved job startup times (Glue Version 2.0) – default selected.
- This Job Run: A proposed script generated by AWS Glue. Enter Script filename.
- Choose source from Data catalog as s3 as source. (Example: nyctaxiraw)
- Transform Type: Change Schema
- Data Target: Use tables in the data catalog and update your data target. Choose the table which have redshift as location (Created in Step 3).
- Schema: Change the Schema if any modification required. Click Save job and Edit Script.
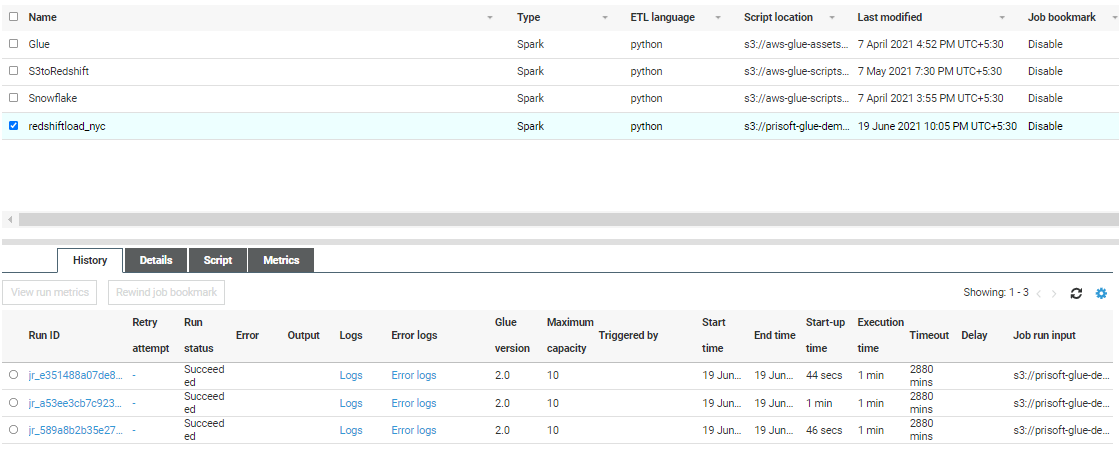
- In the script editor review the script and click on Run job. Go back to glue console and click on the job. You can see details and logs here. Go to Redshift and verify the data loaded in the respective table.
Step 5: Verify data loading in Amazon Athena or Redshift Spectrum
- Open Athena Console Choose Data Source, Database and table. In order to see results.

- Go to Redshift Console. Create External Table using given Code below. Attach The IAM role Created previously.
Create external schema ‘<New Schema in Redshift>’ from data catalog
Database ‘<Database Name>’
iam_role ‘<Specify your IAM role Here>’
Region ‘<Cluster region>’;
- Execute Select Statement to verify data.
Select * from <schema>.<Table> limit 10;
- Below is the sample code used.

Step 6: Create Lambda Function to Trigger Glue Crawler when object is created in Amazon S3 Bucket.
- Go to AWS Lambda function. Then Create Function.
- Select Author from scratch. Give name to your function.
- Choose run time language to Python 3.8.
- Choose existing execution role and select the IAM Role Created Previously in which we have added lambda policy. Then Create function.
- In the Function Console Add Trigger.
- Search and select S3.
- Select your bucket.
- Choose Event type as “All object Create events”.
- Give Prefix as the folder name in which CSV file resides.
- Add Suffix as .csv (optional) and crate the event.
- Go to Code Section and Following code.
import json
import boto3
client= boto3.client('glue')
initRecord=0
def lambda_handler(event, context):
response = client.start_crawler(Name='nyctaxicrawler')
print('----response----')
print(json.dumps(response, indent= 4))
-
To test the function, you can create a test event and, in the code-area put Bracket only.
{}
(Optional: You can see the crawler status running, when you upload a file to bucket/Folder).
Step 7: Create AWS SNS topic to send out Email notifications.
- Go to AWS SNS console. Select Create Topic.
- Choose Standard. (Emails are supported)
- Choose name of the topic. Rest set to defaults.
- The topic will be created. Click on topic and you will see details.
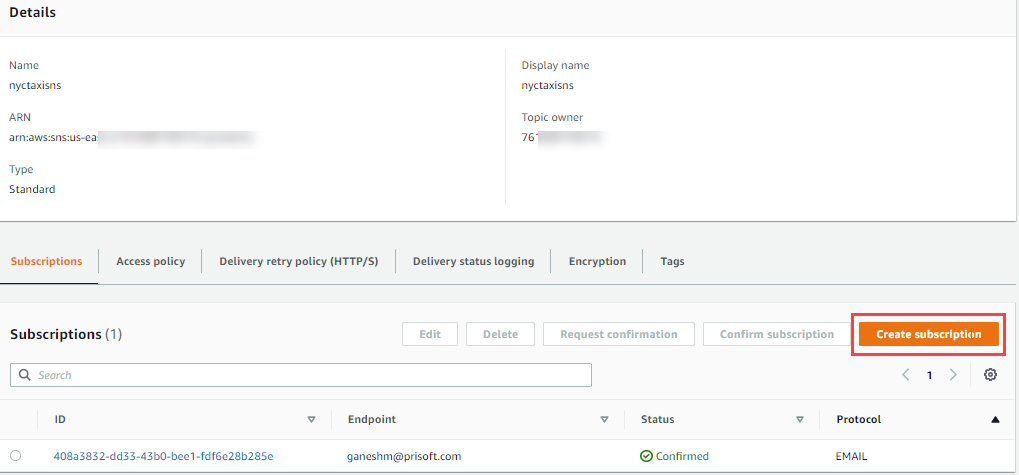
- Create Subscription. Select Protocol as email. Give an Email Address to receive notifications. Click on Create subscription.
- After that a confirmation mail will be sent to the specified email address. After Confirming, the email is now subscribed to the created topic.
Step 8: Create Lambda Function to Start Glue job when Crawler Status is success and send email via SNS.
- Create another lambda Function Like above. Change the Code as Follows. This Function will be triggered when Crawler successfully run. Trigger event to this lambda will be added in the CloudWatch Event rules.
import json
import boto3

topic_arn= 'arn:aws:sns:us-east-2:76168:nyctaxisns'
glueJobName = "redshiftload_nyc"

def lambda_handler(event, context):
  sns_client = boto3.client('sns')
  glue_client= boto3.client('glue')

  response = glue_client.get_table(
  DatabaseName='nyctaxiservice',
  Name='nyctaxiraw'
  )
  lastUpdate = response['Table']['UpdateTime']
  date_time = lastUpdate.strftime("%d/%m/%Y, %H:%M:%S")
  s3location = response['Table']['StorageDescriptor']['Location']+'\n'
  #-------- Email Content ---------#
  Sub= 'Crawler Success Run....Glue Table Updated- nyctaxiraw'
  Msg= 'Last Updated on: '+ date_time+'\n' +'S3 location: '+s3location+'\n \n The glue job started to load data to Redshift.'

  sns_client.publish(TopicArn=topic_arn,Subject= Sub, Message =Msg)
  #--- start glue job---#
  response = glue_client.start_job_run(JobName = glueJobName)
Step 9: Create Lambda Function to Send Email when Glue Job is Successfully Executed.
import json
import boto3

topic_arn= 'arn:aws:sns:us-east-2:76160515:nyctaxisns'
def lambda_handler(event, context):
  sns_client = boto3.client('sns')
  #-------- Email Content ---------#
  Sub= 'Glue Job Successed= RedshiftLoadNyc'
  Msg= 'Glue job is executed and your data is loaded to redshift'
  sns_client.publish(TopicArn=topic_arn,Subject= Sub, Message =Msg)
Step 10: Create CloudWatch event to Trigger Lambda Function When Glue Crawler State is SUCCEEDED.
- Go to CloudWatch. Select Rules under Events.
- Click on Create rule. Select Event Pattern, then Custom Event Pattern.
- Add the Following Code Snippet. Change Names Accordingly.
{
  "detail-type": [
    "Glue Crawler State Change"
],
"source": [
    "aws.glue"
],
"detail": {
  "crawlerName": [
    "nyctaxicrawler"
],
"state": [
    "SUCCEEDED"
    ]
  }
}
- On the Targets side, choose Lambda Function. Select the correct lambda function (STEP 8) which is triggered when Crawler State Changes to “SUCCEEDED”.
Step 11: Create CloudWatch event to Trigger Lambda Function When Glue Job State is SUCCEEDED.
Similar to Step 10, Create CloudWatch event as following and Add Target lambda function (STEP 9) correctly.
{
  "source": [
    "aws.glue"
],
"detail-type": [
    "Glue Job State Change"
],
"detail": {
  "jobName": [
    "redshiftload_nyc"
],
"state": [
    "SUCCEEDED"
    ]
  }
}
Step 12: Test Data pipeline and Visualize in Amazon Quicksight.
- Upload another csv file from TCL trip records to s3/Specified folder.
- When upload is successful, check Glue Crawler is Started or not.
- After Glue Crawler Run Completed, Check Updated table numbers. You will get an email.

- After Glue Crawler Completed, see the Glue Job Started or not. After Glue Job finished you will get another Email.

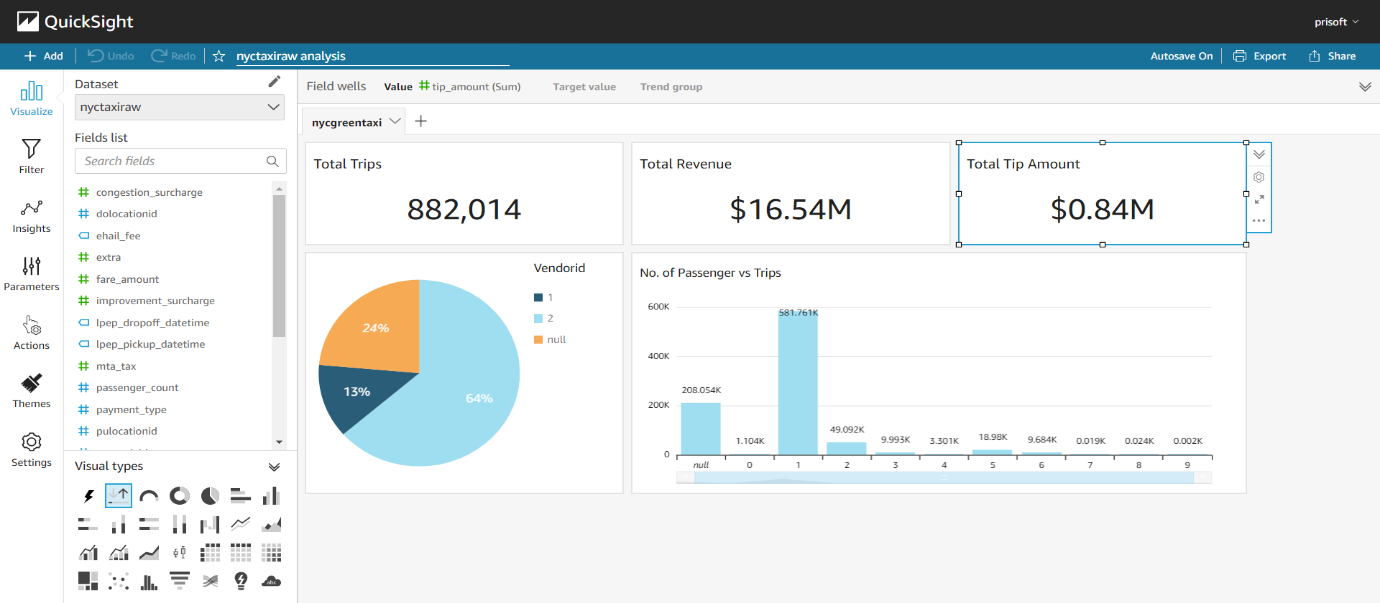
- Here we have created a simple dashboard. You can take Dataset Source from the followings:
- Amazon Athena
- Amazon Redshift
- Amazon Redshift Spectrum (External table)
Conclusion
Data pipeline can be used where simultaneous data processing and analysis is needed. It uses are serverless services like Glue, Lambda, Athena, SNS etc. which is scalable and cost optimized. Lambda can be used to send customized messages through AWS SNS which can be helpful in monitoring and troubleshooting.
About Prisoft
Prisoft has decades of experience in implementing on premise data warehouse solutions around Oracle, Teradata and Microsoft SQL Server technology stack. On our legacy projects we had mainly used Oracle Answers, PowerBI, Tableau and Qlik as the visualization tools. In the evolution process from Oracle to Teradata we are now witnessing a third wave of innovation in data warehousing technology with the advent of cloud data warehouses. As enterprises move to the cloud, they are abandoning their legacy on premise data warehousing technologies, including Hadoop, for these new cloud data platforms. This transformation is a huge tectonic shift in data management and has profound implications for enterprises.
Email: pdash@localhost | www.prisoft.com