Abstract
Lots of data in petabyte scale is generated every moment and to analyze these data quickly is getting tough for organizations. Streaming data makes the job even more complex. AWS comes with a solution called Kinesis, which is capable to collect, process and analyze real-time streaming data, so that we can get timely insights and react accordingly. Amazon Kinesis offers key capabilities to cost-effectively process streaming data at any scale, along with the flexibility to choose the tools that best suit the requirements of your application.
Amazon Kinesis Capabilities
- Kinesis Data Stream
- Kinesis Video Stream
- Kinesis Data Firehose
- Kinesis Data Analytics
In this blog Kinesis Data Firehose will be discussed followed by a hands-on demo.
Introduction to Kinesis Data Firehose
- AWS Kinesis is an autoscaling fully managed service provided by AWS. It is the easiest way to load streaming data into data lakes, data stores, and analytics services.
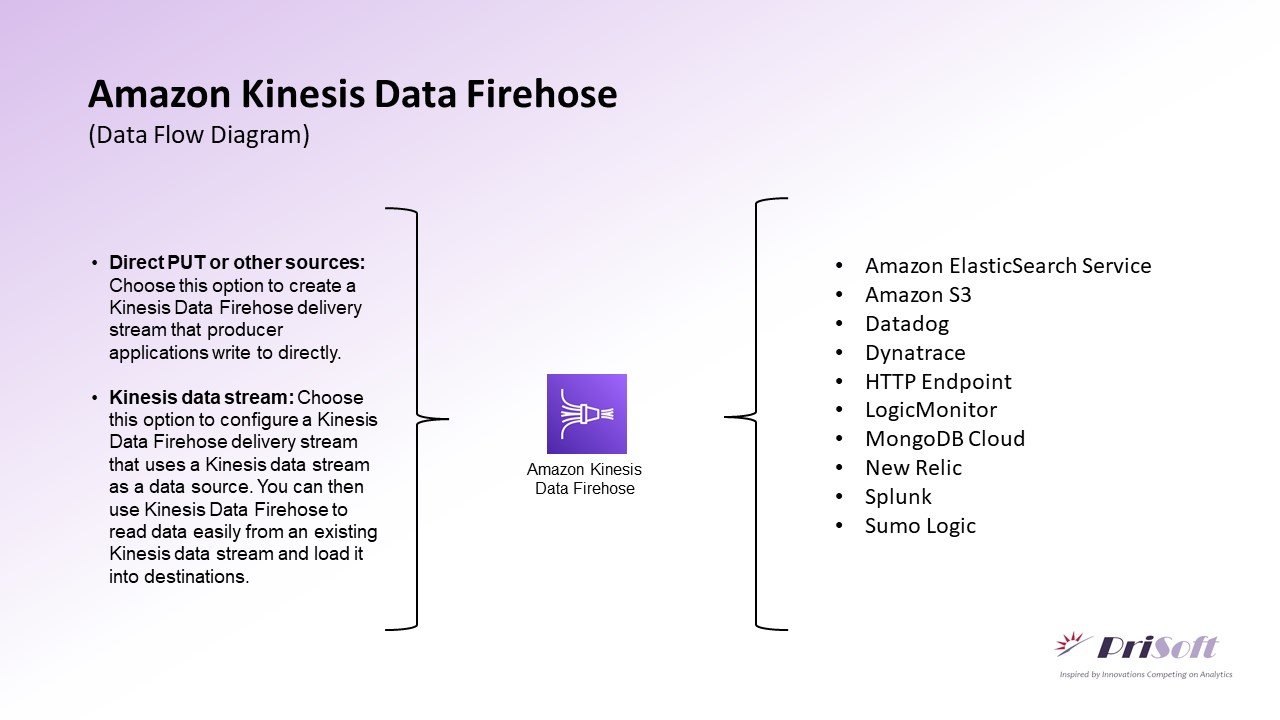
- It can capture, transform, and deliver streaming data to Amazon S3, Amazon Redshift, Amazon OpenSearch Service, generic HTTP endpoints, and service providers like Datadog, New Relic, MongoDB, and Splunk.
- It can also batch, compress, transform, and encrypt your data streams before loading, minimizing the amount of storage used and increasing security.
- Kinesis Data Firehose enables you to prepare your streaming data before it is loaded to data stores.
- Amazon Kinesis Data Firehose captures and loads data in near real time. It loads new data into your destinations with minimum 60 seconds after the data is sent to the service.
- With Amazon Kinesis Data Firehose, you pay only for the volume of data you transmit through the service.
- Kinesis Firehose Sources: Kinesis Data Stream, Kinesis Agent, SDK – Kinesis Producer Library (KPL), CloudWatch Logs & Events, IOT rules actions etc.
Data Flow Diagram
Hands-On Kinesis Firehose Demo
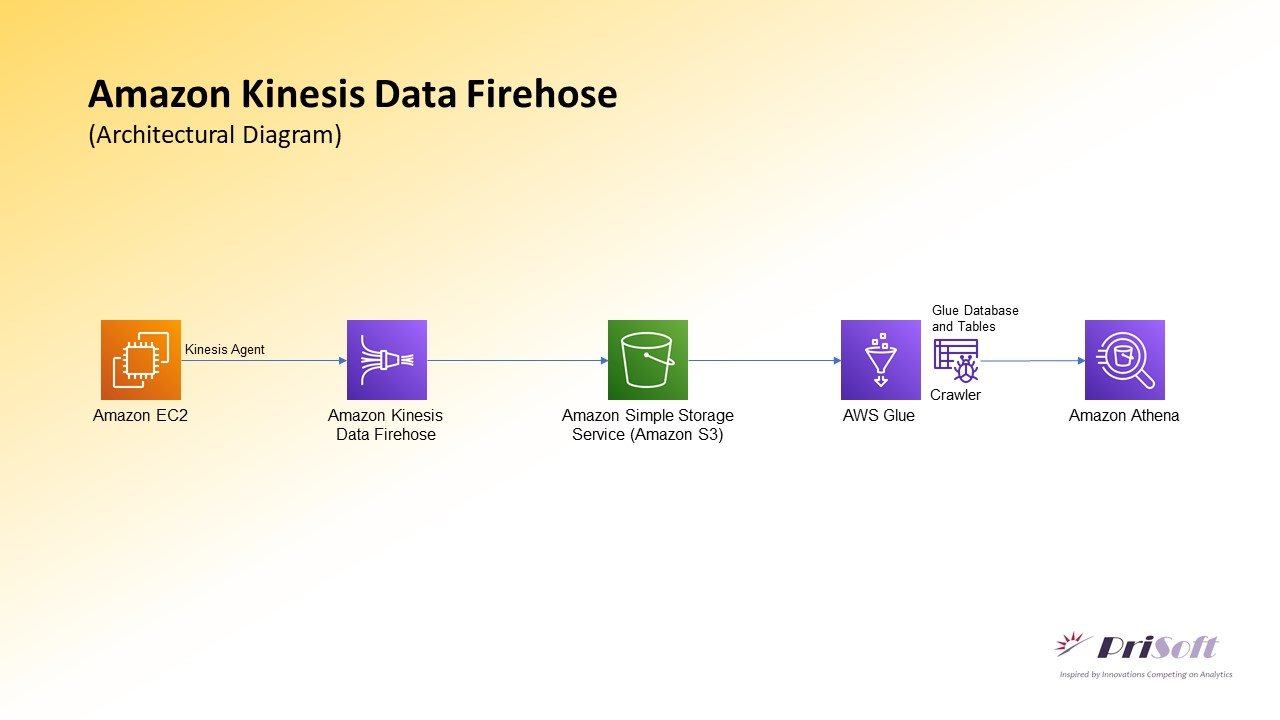
A Kinesis Data Firehose Delivery stream will be created having Direct PUT as Source and S3 as Destination. Then EC2 instance will be created and System logs will be generated using a python script. These logs will be processed and sent using Kinesis-Agent to the Kinesis Firehose and then to AWS-S3. After the data reached at S3 the data will be Crawled using Glue-Crawler. Later this data can be queried and analyzed in Amazon Athena.
Following Steps will be performed:
- Creating AWS Kinesis Data Firehose – Delivery Stream
- Create EC2 instance and attach IAM Role.
- Connect with SSH and run Logs Generator Python Script
- Installing, configuring and starting Kinesis Agent
- Creating Data Catalog using Glue Crawler
- View Data Amazon Athena
1. Creating AWS Kinesis Data Firehose – Delivery Stream
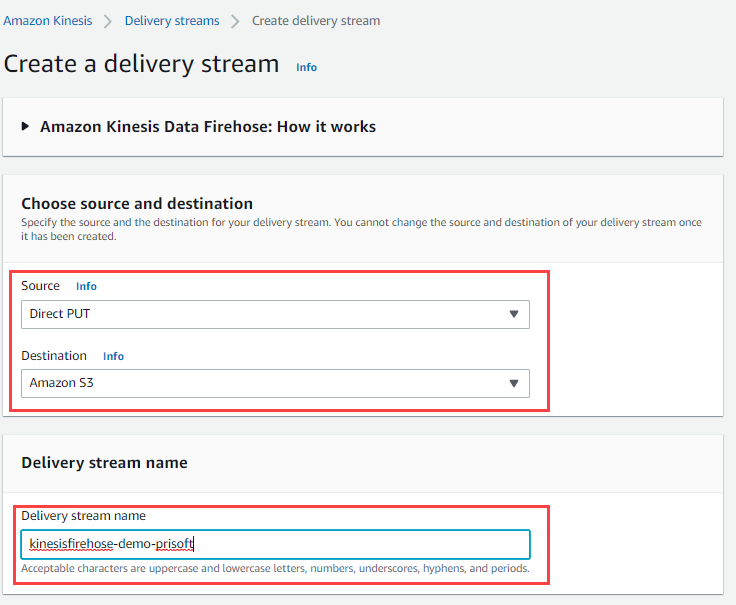
- Go to amazon Kinesis. Choose Create a delivery stream.
- Choose Source: Direct PUT, Destination: Amazon S3
- Set Delivery Stream Name. (Example: kinesisfirehose-demo-prisoft)
- Choose Transform and convert records to as defaults (Disabled).
- In the Destination Settings choose an S3 Bucket, where the Log data will be stored. Choose other settings as default.
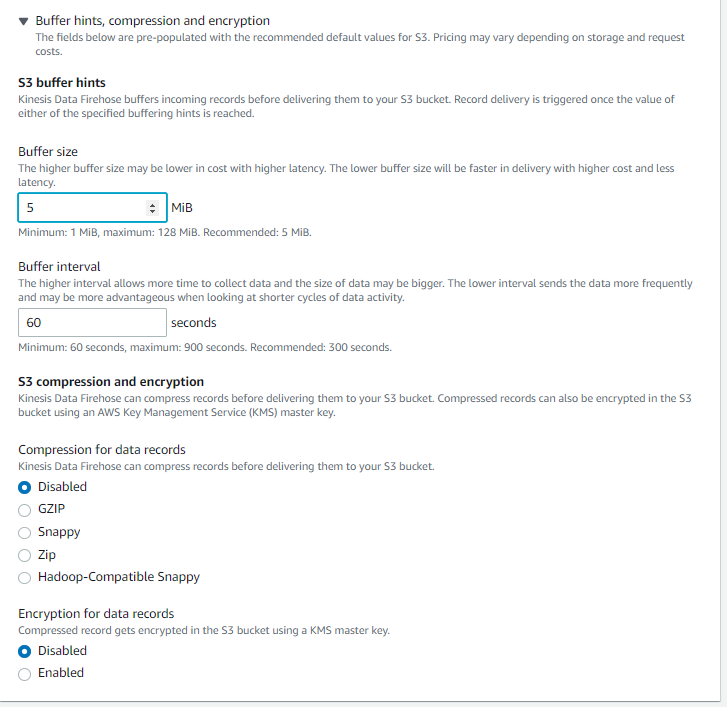
- Expand Buffer hints, compression and encryption. Here Buffer size and Buffer interval can be set. Buffer interval can be 60 sec minimum, so Kinesis Firehose is said to be Near Real-Time and not real-time. The object size in S3 can not exceed the set buffer size.
- Compression and encryptions are disabled here.
- Next Click on Create delivery stream. The firehose stream will be created with in minutes. The Delivery Stream name “kinesisfirehose-demo-prisoft” is used throughout the blog.
2. Create EC2 instance and run Logs Generator Python Script
- Launch an EC2 instance preferable Amazon Linux 2 AMI. For testing purpose ‘t2.micro’ type with free tier eligible is ideal. After that launch the instance. Save the pem file to a secure directory for SSH connect.
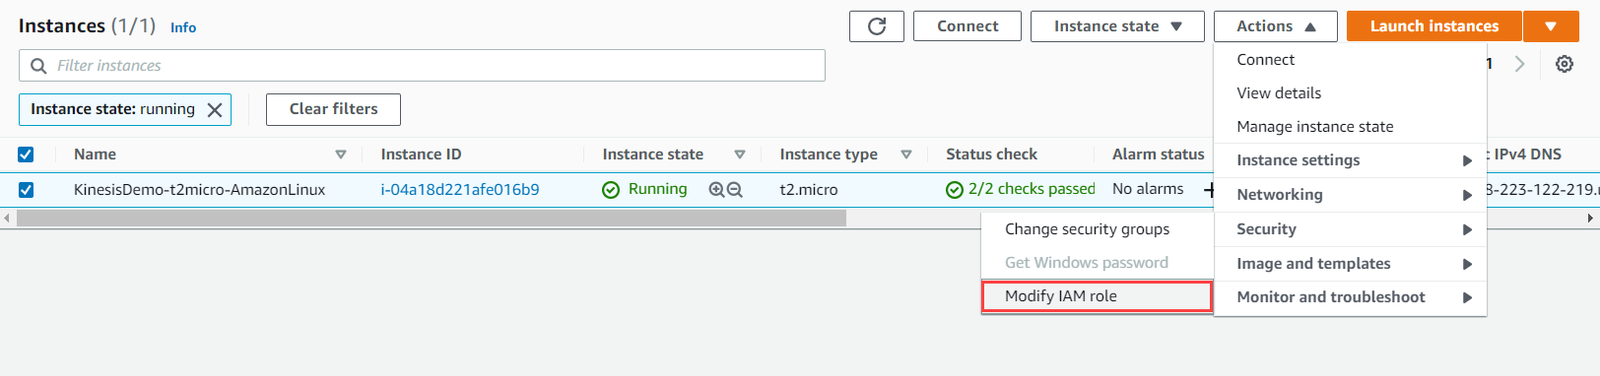
- After instance state changed to running, select that instance, go to Action>Security>Modify IAM role.
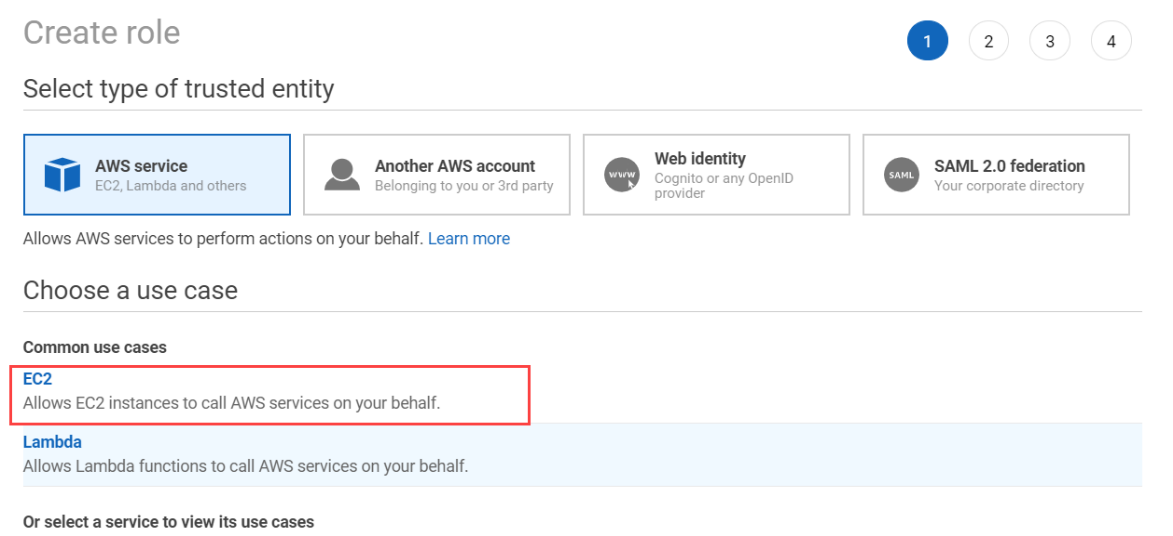
- There click on create new IAM role. This will redirect to IAM-Console. Here click on create role. Choose EC2 as AWS Service.
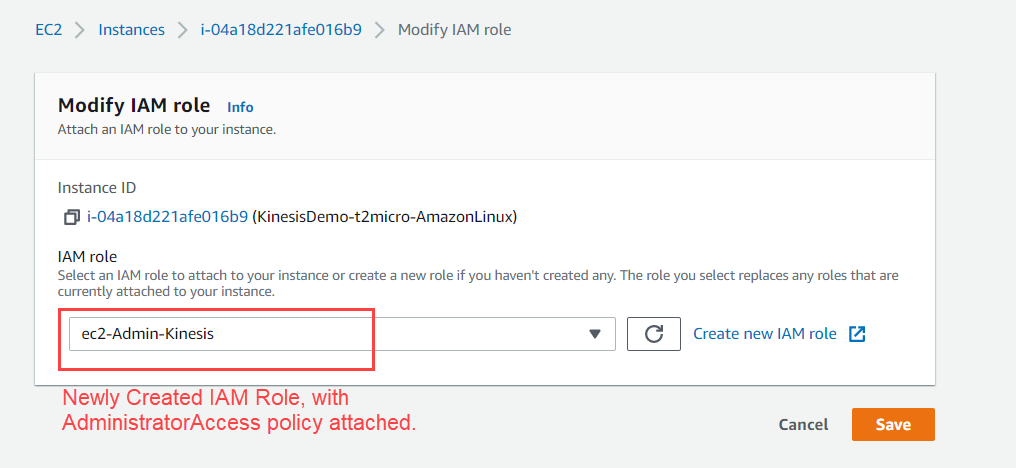
- Next Search policy name as AdministratorAccess. You can also use selective policies for a restrictive access to your account.
- Add tags(optional). Next in Review Section add Role Name and Click on Create Role.
- Now add this newly created role to the EC2 instance in Modify IAM Role Window.
3. Connect with SSH and run Logs Generator Python Script
- Putty will be used as SSH Client. Convert the downlead Pem file to ppk file using PuTTyGen.
- Add the ppk key to in Connection>SSH>Auth. Then go to session and put Hostname as ec2-user@<public-IP of EC2> and then Open.
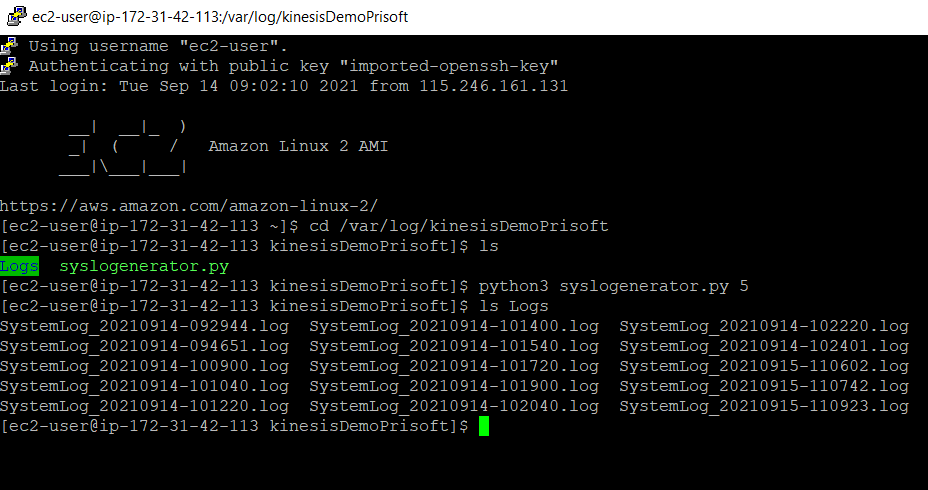
- Create a directory in /var/log/ and go to that directory. Create a folder inside it named Logs. Open a python script with nano editor.
sudo mkdir /var/log/kinesisDemoPrisoft
cd /var/log/kinesisDemoPrisoft
sudo mkdir Logs
sudo nano sysloggenerator.py
- In the editor Paste the following code save it.
# prisoft.com # Kinesis Demo # System log Generator Python Script

import psutil
import platform
from datetime import datetime
import csv
import time
import sys

numFiles = 1
if (len(sys.argv) > 1):
    numFiles = int(sys.argv[1])

def get_size(bytes, suffix="B"):
    factor = 1024
    for unit in ["", "K", "M", "G", "T", "P"]:
        if bytes < factor:
            return f"{bytes:.2f}{unit}{suffix}"
        bytes /= factor

while(numFiles > 0):
    numFiles=numFiles-1
    destFile = time.strftime("Logs/SystemLog_%Y%m%d-%H%M%S.log")
    with open(destFile, 'w', encoding='UTF8', newline='') as f:
        f.close()

    loop = 20
    while(loop > 0):
        loop=loop-1
        currentTime = datetime.now()
        #-----System Information ------#
        uname = platform.uname()
        system = uname.system
        node = uname.node
        version = uname.version
        #-----CPU Information -------#
        cpuUsagePercent = psutil.cpu_percent()
        #------RAM Usage -------#
        svmem = psutil.virtual_memory()
        totalMemory = get_size(svmem.total)
        availMemory = get_size(svmem.available)
        usedMemory = get_size(svmem.used)
        #-------Disk Usage --------#
        partitions = psutil.disk_partitions()
        mountPoint = [None] * len(partitions)
        diskUsagePercent = [None] * len(partitions)
        i=0
        for partition in partitions:
            mountPoint[i] = partitions[i].mountpoint
            try:
                    partition_usage = psutil.disk_usage(partitions[i].mountpoint)
            except PermissionError:
                    # this can be catched due to the disk that not ready
                    continue
            diskUsagePercent[i] = partition_usage.percent
            i=i+1
        #-------Network Usage--------#
        net_io = psutil.net_io_counters()
        totalByteSent = net_io.bytes_sent
        totalByteRecv = net_io.bytes_recv
        logData = [currentTime, system, node, version, cpuUsagePercent, totalMemory, availMemory, usedMemory, mountPoint[0], diskUsagePercent[0], totalByteSent, totalByteRecv]

        with open(destFile, 'a', encoding='UTF8', newline='') as f:
            writer = csv.writer(f, delimiter=',', lineterminator='\r\n', quotechar = '"')
            writer.writerow(logData)
            f.close()
        time.sleep(6)
- Install dependent Library and run the python code.
pip3 install psutil
python3 sysloggenerator.py 10
- This will generate 10 Log files with an interval of 1 minute each inside the /var/log/kinesisDemoPrisoft/Logs directory. You can change the number of log file generated by changing the script argument ex: python3 <Python Script> <Arg>.
4. Installing, configuring and starting Kinesis Agent
- Install Kinesis Agent using following command.
sudo yum install -y aws-kinesis-agent
- Go to kinesis config directory and edit “agent.json” file.
cd /etc/aws-kinesis
sudo nano agent.json
- Edit the JSON file as follows. Change ‘us-east-2’ to your kinesis firehose hosted Zone. Here the AWS Access and Secret keys are left blank since we have attached IAM role to EC2. Keys can be explicitly mentioned here but this method is considered less secure. Mention the file pattern accordingly. Insert the firehose Delivery Stream name in the code.
{
  "cloudwatch.emitMetrics": true,
  "kinesis.endpoint": "",
  "firehose.endpoint": "firehose.us-east-2.amazonaws.com",
  "awsAccessKeyId": "",
  "awsSecretAccessKey": "",
  "flows": [
    {
      "filePattern": "/var/log/kinesisDemoPrisoft/Logs/*.log",
      "deliveryStream": "kinesisfirehose-demo-prisoft"
    }
  ]
}
- After Saving the JSON file. Start the kinesis using following command.
sudo service aws-kinesis-agent start
- Whenever the “agent.json” is edited the service is restarted.
sudo service aws-kinesis-agent restart
- To run Kinesis, when EC2 instance is started.
sudo chkconfig aws-kinesis-agent on

- Kinesis Log can be verified using following command.
tail -f /var/log/aws-kinesis-agent/aws-kinesis-agent.log
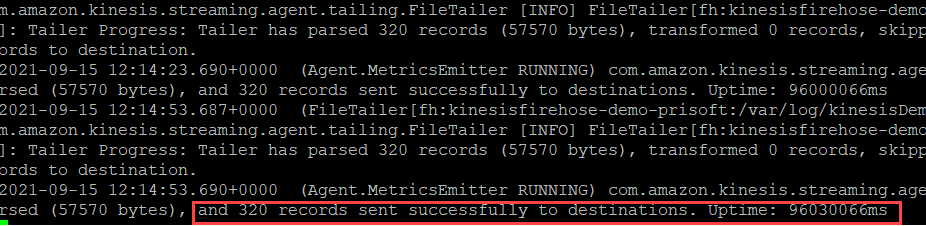
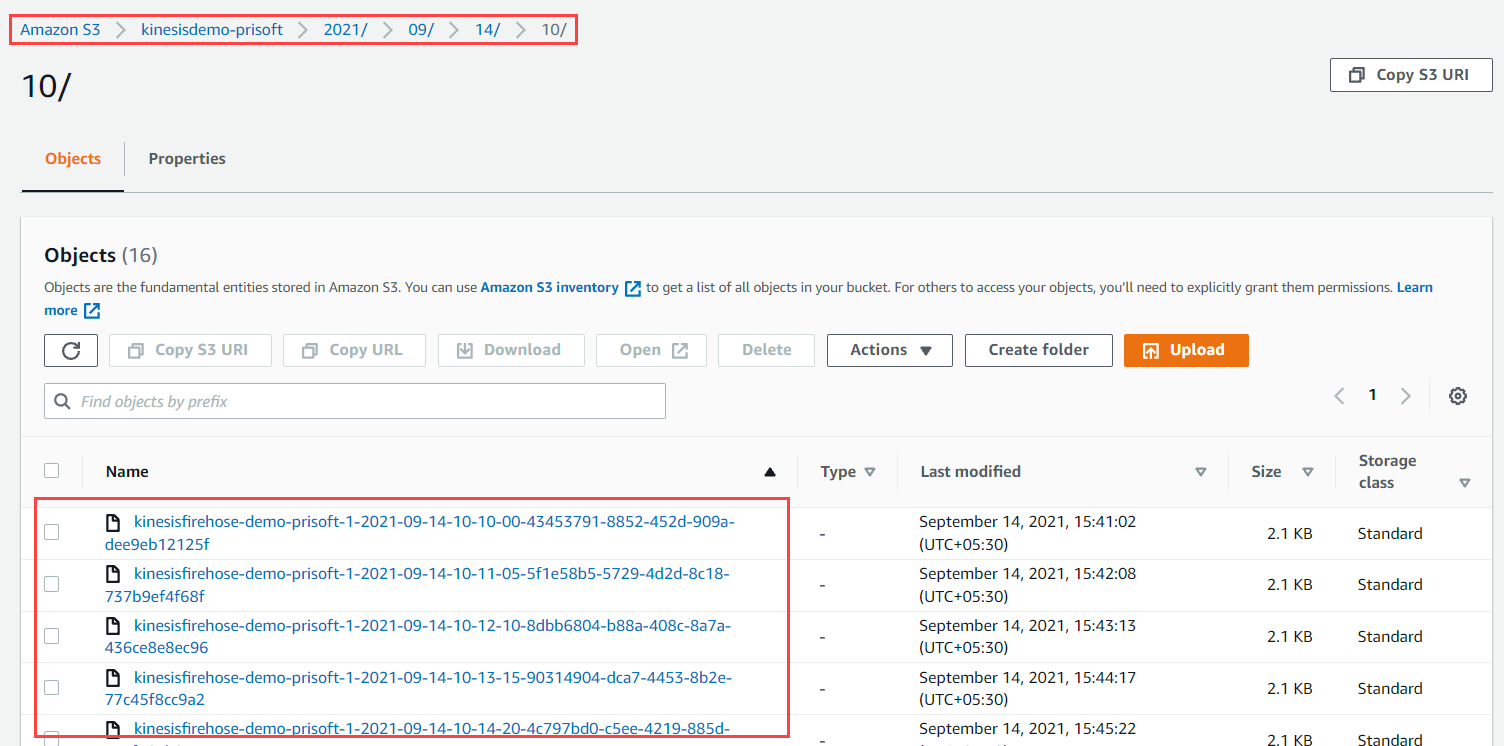
- Data Objects can be seen inside S3 having Folder structure Year/Month/Day/Hour.
5. Creating Data Catalog using Glue Crawler
- Go to AWS Glue Crawler, then add a new crawler. Enter Crawler Name.
- Specify crawler source type
- Crawler source type: Data stores
- Repeat crawls of S3 data stores: Crawl all folders
- Add a data store
- Choose a data store: S3
- Include path:<Choose the S3 Bucket>
- Choose an IAM role
- Create an IAM role or Choose an existing IAM role
- Frequency: Run on Demand
- Configure the crawler’s output
- Add a Database. Enter Database Name.
- Review and Finish. Then Run the Crawler.
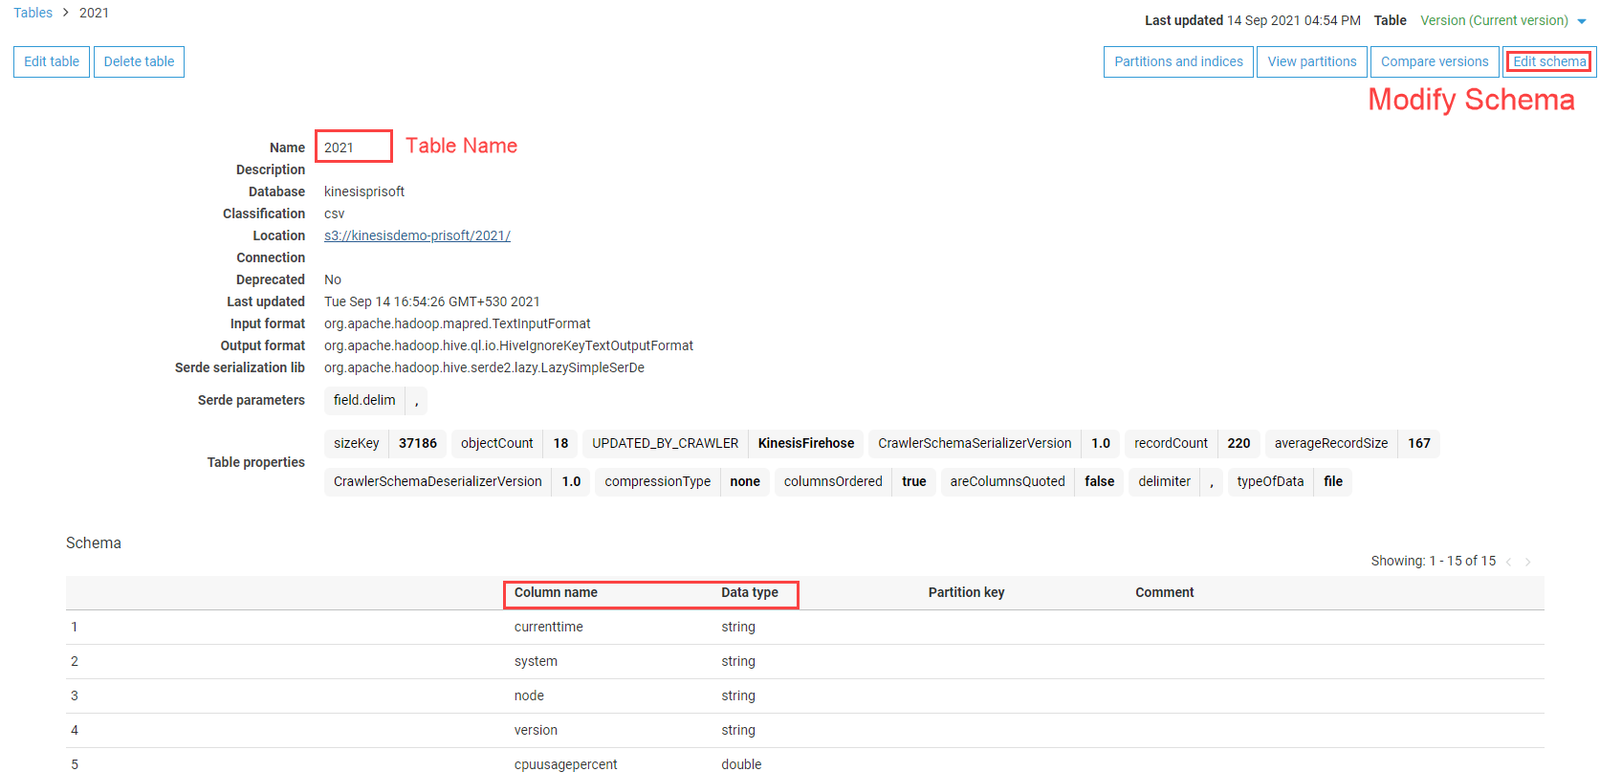
After successful run of Glue Crawler, the Catalog will be populated with database and table. The schema of the table can be modified. The column names of the data are changed accordingly.
6. View Data Amazon Athena
Athena is serverless query service offered by amazon. It makes the tasks of analyzing data on S3 quite a lot easier. Athena is prebuilt to integrate with AWS Glue allowing to create a unified metadata repository across various services, crawl data sources to discover schemas and populate your Catalog with new and modified table and partition definitions.
Data generated from the Kinesis Firehose to AWS S3 now can be queried using Athena. Open Athena query editor, select Data source as AwsDataCatalog and select the database created previously and write sql query from that table.

Conclusion
AWS Kinesis Data firehose is capable of ingesting data in near real-time (60 seconds minimum) to AWS Data Lake services. Amazon Kinesis Data Firehose is a fully managed service, with no ongoing administration required. Kinesis Data Firehose manages all underlying infrastructure, storage, networking, and configuration needed to stream your data from your source to your destination. Following are some of use cases:
- Data Streaming into Data Lake and Data Warehouse
- Streaming Machine Learning Applications
- Log and IoT Analytics
- Security and system-health monitoring